
Frequently Asked Questions
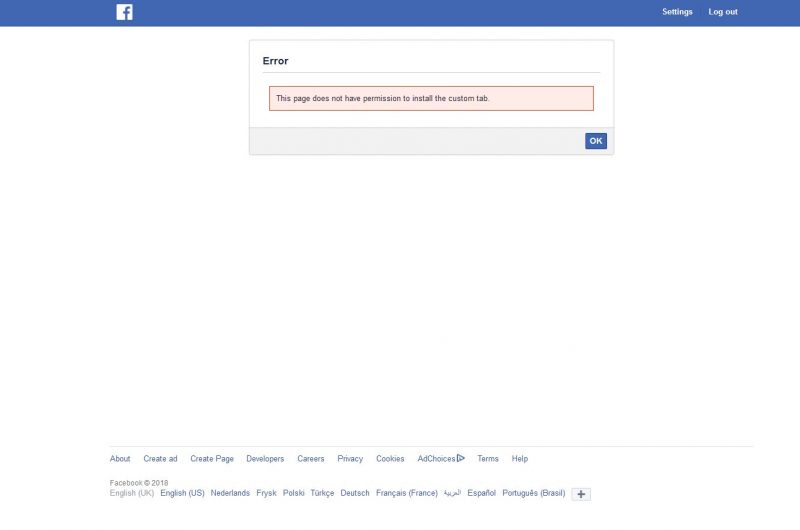
Short answer: Facebook changed its rules.
Details: Due to recent API changes, Facebook decided only to allow this feature when you have more than 2000 page likes.
Solution?
Best solution to be able to get online bookings directly from your (<2k liked) Facebook page, is to convince Facebook they should lift this limitation: Ask them.
Within current rules, the only solution is to get 2000 likes. Real likes or bought ones (latter not advised).
Workaround
A powerful manual workaround is just posting content with prepared booking scripts from the getBIZZI widget service. There is always a way getting your services noticed!
We apologize for this inconvenience but this is something we do not have control over.
Popular?
For those of you who do have an active and widely appreciated Facebook page, make sure your followers are even more charmed by your integrated online booking service. Clicking a ‘Book Now’ button and claim your appointment within Facebook maybe more to their liking!
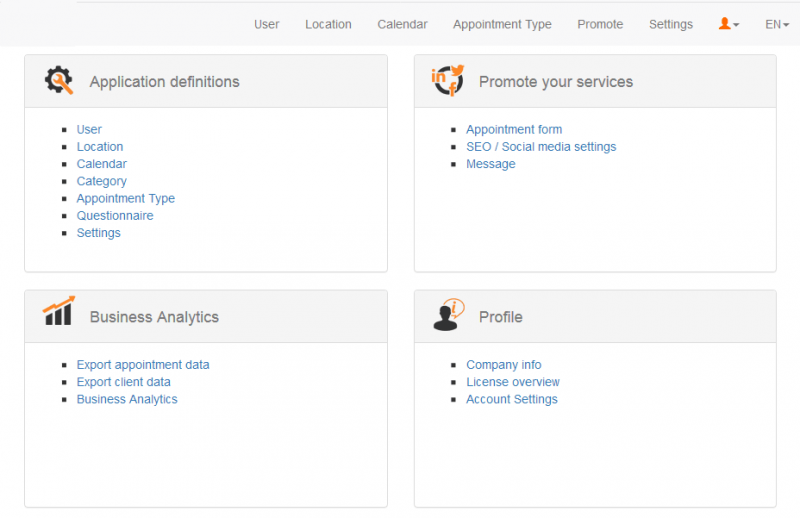
Log in as a calendar holder and your online calendar management environment looks something like this:
When you have enabled your booking portal, your company is bookable 24-7 and can be found on https://bedrijfsnaam.getbizzi.eu NB! so without www in the url otherwise you probably get an error message from your browser and/or antivirus program. Your calendar is not accessible through the World Wide Web but through the secure SSL connection under getbizzi.eu.
Therefor you can mention your company via mail, text or app messages, social or in your website content via htpps://companyname.getbizzi.eu (enter your given url instead of ‘companyname’ when signing up with getBIZZI)
Of course, you as a manager can appoint a total of 4 agenda holders. They can manage their own agenda themselves.
Need more? Then you order several, for each batch of 4 calendars (discount starts at 5 batches).
Find out where your customers are online and go and recruit.
- Make sure your booking button is clearly visible on your website.
- Create a booking link (see here how).
- Send invitations via your mail network (with permission).
- Create an offer page on your website.
- Provide a Facebook calendar page (check FB rules).
- Make your current customers a special offer .
- All the above free promotions can be complemented with paid campaigns via Social Media.
Show or change your client details of an existing appointment.
1. Log in as a calendar or resource manager.
2. Click on the ‘My Appointments’ menu. A page with ‘Day agenda’ or’Planbord’ appears. (NB: it may occur that the word “Agreements” is adapted to your technical jargon)
3. Go to the correct date by clicking on a date of the calendar or on the navigation keys in the calendar header.
4. If logged in as resource manager: click on the resource calendar name in the plan board header. A “Day calendar” page appears.
5. Click on a client name of an existing appointment in the calendar. A floating window ‘Client Registration’ appears. (Note: the word ‘Client’ may be adapted to your technical jargon)
6. If necessary, click the’i’ button in the header for more help about the input fields.
7. After changing the data click on the ‘Save’ button.
Prevent – for whatever reason – that a certain client makes new appointments by blocking it’s access rights.
1. Log in as a calendar or resource manager.
2. Click on the ‘Clients’ menu. A page with table ‘Clients’ appears. (Note: the word ‘clients’ may be adapted to your professional jargon)
3. Search for your clients quickly by entering a search query and then press the Enter key on the keyboard.
4. Click on the ‘Change’ button in the table row to change a client (or click on the client in the table). A floating window ‘Client’ appears.
5. If necessary, click the’i’ button in the header for more help about the input fields.
6. Delete the contents of the ‘User Name’ field and click on the ‘Save’ button.
Guide your clients through a questionnaire to obtain additional information before the appointment is finalized.
1. Log in as application manager.
2. Click on the ‘Questionnaire’ menu. A page with table ‘Questionnaire’ appears.
3. Click on the ‘Add’ button to create a questionnaire. A “Questionnaire Wizard” page appears with step 1 “Enter the questionnaire”.
4. Enter the required fields. Choose ‘Make appointment’ the selection choice ‘before the questionnaire starts’ and choose from the ‘Available appointment type’ drop-down list the appointment types to which this questionnaire should be linked. (NB: it may happen that the words “Appointment” is adapted to your technical jargon) If necessary, click on the “Help” button in the toolbar for more help about the input fields.
5. Click on the’Next ‘button. A ‘Questionnaire Wizard’ page appears with step 2 ‘Enter the questions’.
6. Select the already available questions by entering part of the question content or click on the ‘Create new question’ button. Repeat this step until all questions have been entered. If necessary, click on the ‘Help’ button in the toolbar for more help about the input fields.
7. If in step 1 for ‘Questionnaire style’ the selection choice ‘decision tree structure’ has been chosen, click on the’Next ‘button. A “Questionnaire Wizard” page appears with step 3 “Define the follow-up action”. If necessary, click on the ‘Turn off answer’ button and check whether the correct actions have already been defined. Optionally click on an action link and change its contents. Repeat this step until all follow-up actions have been defined. If necessary, click on the ‘Help’ button in the toolbar for more help about the input fields.
8. Click on the ‘Save’ button.
Using the Message Board you can easily communicate with customers. This is the content for your personal appointment portal.
1. Log in as application manager.
2. Click on the ‘Message’ menu. A ‘Message’ page appears.
3. Enter a message and click on the ‘Save’ button.
4. Click on the list of languages at the top of the word processing toolbar for multilingual use.
To finalize an appointment, your client must complete a registration form with the (mandatory) input fields you have defined.
1. Log in as application manager.
2. Click on the ‘Settings’ menu. A ‘Settings’ page appears with various options.
3. Click on the ‘Registration’ button in the toolbar.
4. If necessary, click on the ‘Help’ button in the toolbar for more help about the input fields.
5. Click the ‘Show’ or ‘Mandatory entry’ fields.
6. If necessary, enter the self-defined input fields.
7. Click on the ‘Save’ button.
Clients can make appointments ‘subject to approval’. New appointments are shown immediately for approval after the calendar manager has logged in.
1. Log in as application manager.
2. Click on the ‘Settings’ menu. A ‘Settings’ page appears with various options.
3. Click on the ‘System’ button in the toolbar.
4. If necessary, click on the ‘Help’ button in the toolbar for more help about the input fields.
5. Click on the ‘Client appointments’ drop-down list and choose ‘Subject to approval’.
6. Click on the ‘Save’ button.
Reduce no-shows by reminding your clients of their appointments by means of an SMS.
1. Log in as application manager.
2. Click the Appointment type menu. A page with table ‘Event type’ appears.
3. Click on the ‘Change’ button in the table row to change an appointment type (or click on the appointment type in the table). A floating window ‘Event type’ appears.
4. If necessary, click the’i’ button in the header for more help about the input fields.
5. Enter the number of hours in advance, in the field ‘Send reminder (hours in advance)’ at the bottom of the window. (NB: the profile of the client must include the list of options ‘Reminder via’ with content SMS or Email and SMS)
6. Click on the ‘Save’ button.
Ask your help to the Helpdesk in an effective way.
1. Log in as administrator.
2. Click the ‘Request Helpdesk’ button in the top right of the program. A floating ‘Ask Helpdesk’ window appears.
3. Enter your message and click on the ‘Send’ button.
Keep always informed of your client appointments as an agenda or resource manager.
1. Log in as a calendar or resource manager.
2. Click the ‘Profile’ button in the top right of the program. A ‘Personal Profile’ page appears.
3. Click on the ‘Inform about client appointments per’ list box and choose ‘E-mail and SMS’. The ‘Mobile phone’ field appears. (Note: the word ‘client’ may be adapted to your technical jargon)
4. Enter the mobile number. (Note: SMS is only sent with available SMS inventory)
5. Click on the ‘Save’ button.
Make an appointment quickly in your own day agenda.
1. Log in as a calendar or resource manager.
2. Click on the ‘My Appointments’ menu as the calendar manager or ‘Planner’ as resource manager. A “Day calendar” or “Plan” page appears. (NB: it may occur that the word “Appointment” is adapted to your technical jargon)
3. Go to the correct date by clicking on a date of the calendar or on the navigation keys in the calendar header.
4. Click on an empty time slot in the calendar or planning board to create an appointment or click on an existing appointment to change. A ‘Make / Change appointment’ page appears.
5. If necessary, click on the ‘Help’ button in the toolbar for more help about the input fields.
6. Enter the required fields and click on the ‘Save’ button.
First guide your client through a questionnaire and determine on the basis of the answers with whom and which type of appointment is made.
1. Log in as application manager.
2. Click on the ‘Questionnaire’ menu. A page with table ‘Questionnaire’ appears.
3. Click on the ‘Add’ button to create a questionnaire. A “Questionnaire Wizard” page appears with step 1 “Enter the questionnaire”.
4. Enter the required fields. Choose ‘Make appointment’ the selection choice ‘derived from the questionnaire’. (NB: it may happen that the word “Appointment” is adapted to your technical jargon) If necessary, click on the “Help” button in the toolbar for more help about the input fields.
5. Click on the’Next ‘button. A ‘Questionnaire Wizard’ page appears with step 2 ‘Enter the questions’.
6. Select the already available questions by entering part of the question content or click on the ‘Create new question’ button. Repeat this step until all questions have been entered. If necessary, click on the ‘Help’ button in the toolbar for more help about the input fields.
7. If in step 1 for ‘Questionnaire style’ the selection choice ‘decision tree structure’ has been chosen, click on the’Next ‘button. A “Questionnaire Wizard” page appears with step 3 “Define the follow-up action”. If necessary, click on the ‘Turn off answer’ button and check whether the correct actions have already been defined. Optionally click on an action link and change its contents. Repeat this step until all follow-up actions have been defined. If necessary, click on the ‘Help’ button in the toolbar for more help about the input fields.
8. Click on the ‘Save’ button.
9. Perform the procedure’ Promote online appointments on your website’ on your website and select ‘Content & Make an appointment’ from the ‘Widget type’ list box.
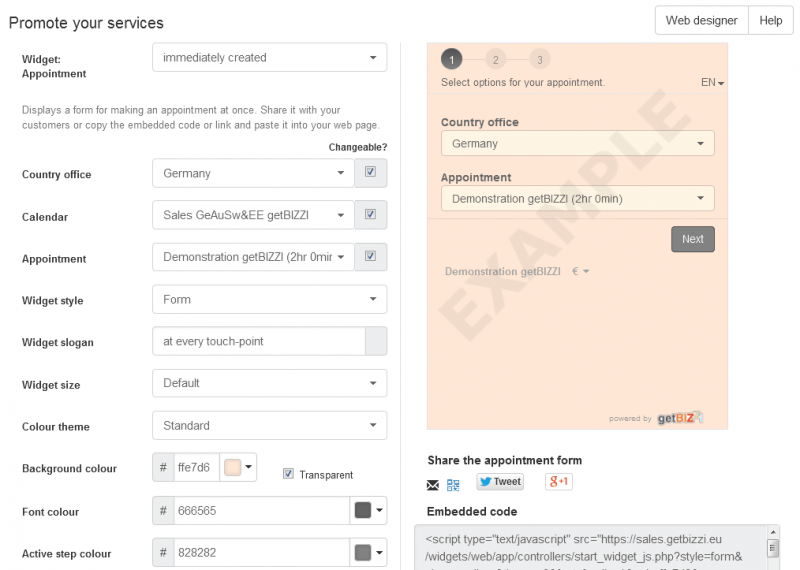
Increase your reach by placing a widget in the form of an appointment form, appointment button or hyperlink on your own or other websites.
1. Log in as administrator.
2. Click the ‘Place widget’ button in the top right of the program. A floating window ‘Place widget’ appears.
3. Optionally, click on the ‘Widget type’ drop-down list.
4. Define the widget using the available selection lists and input fields.
5. Click the “Preview” button to display the defined widget.
6. Click on the generated html code and copy the content by holding down the Control key and then pressing the C key of the keyboard. The content is copied to the clipboard, which can then be pasted into your website by holding down the Control key and then pressing the V key on the keyboard.
You can integrate your services schedule into your website or social media channels in various ways. Via a ‘Book Now’ button or via a link in your web content or even via a small, integrated live calendar through a widget.
This is how you create your own codes: Step by Step widget generator.
You can easily create the codes to build this via our widget generator. This is accessible in your dashboard via ‘Promote’. You can fix this yourself or, if you prefer this to be done by your web designer, you can authorize it once to generate the codes for you [use Webdesigner button].
Organize a workshop, seminar or other kinds of meetings with a predetermined number of participants.
1. Create an appointment type of the ‘event’ type by executing the Create / Modifying a Event Types procedure.
2. Complete the procedure ‘Create or edit an appointment in your diary’ and select the appointment type ‘event’ from the ‘Appointment type’ drop-down list and enter the group size.
3. If necessary, carry out the procedure “Invite your clients by means of an rSVP” or follow the procedure “Promote Online Appointment on your website” to bring this event to your clients.
Make an extra note with an appointment without being sent to your client.
1. Log in as a calendar or resource manager.
2. Click on the ‘My Appointments’ menu as the calendar administrator or ‘Plan’ as the resource manager. A “Day calendar” or “Plan” page appears. (NB: it may occur that the word “Appointments” is adapted to your technical jargon)
3. Go to the correct date by clicking on a date of the calendar or on the navigation keys in the calendar header.
4. If logged in as resource manager: click on the resource calendar name in the plan board header. A “Day calendar” page appears.
5. Click on the “Create an annotation” button to the right of an existing appointment in the annotation calendar. A floating window appears’Antekening’.
6. Enter the note and click on the ‘Confirm’ button.
Send a mail with login details to your client in case these are not known or forgotten.
1. Log in as a calendar or resource manager.
2. Click on the ‘Clients’ menu. A page with table ‘Clients’ appears. (Note: the word ‘clients’ may be adapted to your professional jargon)
3. Search for your clients quickly by entering a search query and then press the Enter key on the keyboard.
4. Click on the ‘Mail username and password’ button in the table row of the relevant client.
5. If no email or user name is known for clients, a floating window ‘Mail username and password’ will appear. Enter the required fields. If necessary, click the’i’ button in the header for more help about the input fields.
6. A message appears stating that the notification email has been successfully sent.
Guide your clients directly to a pre-set timed appointment form by sending an email with an rSVP hyperlink.
1. Log in as a calendar or resource manager.
2. Click on the ‘Clients’ menu. A page with table ‘Clients’ appears. (Note: the word ‘clients’ may be adapted to your professional jargon)
3. Search for your clients quickly by entering a search query and then press the Enter key on the keyboard.
4. Click on the ‘Message’ button in the table to send a message to the relevant client or click on the ‘Message’ button in the button bar to send a message to all selected clients from the ‘Clients’ table. A floating window’New message’ appears.
5. Enter the required fields and click on ‘Add rSVP’. Appointment parameters appear.
6. Click on the selection list of the appointment parameters and select the content for correct rSVP control.
7. Click on the ‘Send’ button. An email with rSVP link is sent to the selected clients.
Remind your clients of the upcoming appointment by SMS or receive an SMS as an administrator after an appointment has been made or changed by your client.
1. Log in as application manager.
2. Click on the ‘Settings’ menu. A ‘Settings’ page appears with various options.
3. Click on the ‘SMS’ button in the toolbar. (after … dropdown)
4. If necessary, click on the ‘Help’ button in the toolbar for more help about the input fields.
5. Click on the selection list ‘SMS package’ and make a selection.
6. Click the ‘Go to Pay’ button and follow the payment instructions
Within your settings dashboard, you find HELP buttons everywhere that give more information. We assume that you can find most of the answers here.
If it turns out to be more difficult, you can send us a support e-mail. getBIZZI aims to answer your questions within two working days. Often, we try and solve your issue the same day, because we know that your business is running on this. In practice, it means that if the answer cannot be found in the FAQ or in any other content, we will have personal contact about it.
Use your appointment data from one or more diaries for invoicing or correspondence.
1. Log in as a calendar or resource manager.
2. Click on the ‘My Appointments’ menu as the calendar administrator or ‘Plan’ as the resource manager. A “Day calendar” or “Plan” page appears. (NB: it may occur that the word “Appointments” is adapted to your technical jargon)
3. Click on the ‘Export’ button in the button bar to export the appointment data file.
4. Select the calendar, select a period and click on the button’Download’.
Repeat free time or time locked blocks in your calendar so that clients can no longer make appointments to those time slots.
1. Log in as a calendar or resource manager.
2. Click on the ‘Free Time’ menu. A page with table ‘Free Time’ appears.
3. Click on the ‘Add’ button in the toolbar. A floating window ‘Free Time’ appears for creating a free time or click on the ‘Change’ button in the table row to change a free time (or click on the free time in the table).
4. If necessary, click the ‘i’ button in the header for more help about the input fields.
5. Click on the “Repeat” button. More details appear for recording the repeat frequency.
6. After entering all the data, click on the ‘Save’ button.
Make an appointment and enter a new client at the same time.
1. Perform the procedure “Create or change an appointment in your schedule”.
2. Click on the ‘Event Type’ drop-down list and make a selection. A ‘Client’ button appears in the toolbar. (Note: the word ‘Client’ may be adapted to your technical jargon)
3. Click on the ‘Client’ button to enter a new client. A floating window ‘Client Registration’ appears.
4. If necessary, click the’i’ button in the header for more help about the input fields.
5. After entering all the data, click on the ‘Save’ button.
Appointment type is a type of appointment with the associated parameters for optimal guidance of your client when making an appointment.
1. Log in as application manager.
2. Click the Appointment type menu. A page with table ‘Event type’ appears.
3. Click on the ‘Add’ button in the button bar to create an appointment type or click on the ‘Change’ button in the table row to change an appointment type (or click on the appointment type in the table). A floating window ‘Event type’ appears.
4. If necessary, click the’i’ button in the header for more help about the input fields.
5. After entering all the data click on the ‘Save’ or ‘Save & amp; Translate for multilingual use.
A category Groups Calendars that can be linked to an appointment type for more effective sending of your clients to make an appointment.
For booking purposes it can be very useful for the visitor to see that certain groups of appointments have been set up. E.g. Beauty salons have Category ‘Permanent makeup’ (for treatment types eyeliner under, lipliner, fresh-up etc.)
1. Log in as application manager.
2. Click on the’Category’ menu. A page with table ‘Category’ appears.
3. Click on the ‘Add’ button in the button bar, to create a category or click on the ‘Change’ button in the table row to change a category (or click on the category in the table). A floating ‘Category’ window appears.
4. If necessary, click the ‘i’ button in the header for more help about the input fields.
5. After entering all the data click on the ‘Save’ or ‘Save & Translate’ for multilingual use.
Calendars are persons or resources with which an appointment can be made.
1. Log in as application manager.
2. Click on the ‘Calendar’ menu. A page with table ‘Calendar’ appears.
3. Click on the ‘Add’ button in the button bar to create a calendar, or click on the ‘Change’ button in the table row to change a calendar (or click on the calendar in the table). A floating window will appear: ‘New Calendar’.
4. If necessary, click the ‘i’ button in the header for more help about the input fields.
5. After entering all the data, click on the ‘Save’ button.
Removing duplicate clients and easily combine appointment history.
1. Log in as a calendar or resource manager.
2. Click on the ‘Clients’ menu. A page with table ‘Clients’ appears. (Note: the word ‘clients’ may be adapted to your professional jargon)
3. Click the ‘Merge’ button in the toolbar. A table ‘Clients duplicates remover’ appears.
4. Quickly search for your clients by entering a search query and then press the Enter key on the keyboard.
5. Select the fields ‘Head’ and ‘Merge’.
6. Click the ‘Merge’ button in the toolbar or in the row of tables to duplicate the selected clients and merge the appointment history.
Show all appointments of your client in one overview.
1. Log in as a calendar or resource manager.
2. Click on the ‘Clients’ menu. A page with table ‘Clients’ appears. (Note: the word ‘clients’ may be adapted to your professional jargon)
3. Search for your clients quickly by entering a search query and then press the Enter key on the keyboard.
4. Click on the ‘Go to appointments’ button in the table row to request the appointments from the relevant client. A page with a table of appointments from the last few weeks appears. (NB: it is possible that the word ‘agreements’ is adapted to your professional jargon)
5. Click on the ‘Show appointments from the past’ option button to consult the appointment history.
6. Click on the ‘Go to the calendar’ button in the table row for consulting the appointment in the day schedule.
Tune the Online Appointment system to your professional jargon and change names such as agenda, client, appointment and category.
1. Log in as application manager.
2. Click on the ‘Settings’ menu. A ‘Settings’ page appears with various options.
3. Click on the ‘Field names’ button in the toolbar.
4. If necessary, click on the ‘Help’ button in the toolbar for more help about the input fields.
5. Change the contents of the input fields to your jargon language.
6. Click on the ‘Save’ button.
7. If necessary, click on the list of languages in the header for multilingual use.
Block all day in your calendar so that you are free for making your plans.
1. Log in as a calendar or resource manager.
2. Click on the ‘My Appointments’ menu. A “Day calendar” or “Plan” page appears. (NB: it may occur that the word “Appointments” is adapted to your technical jargon)
3. Go to the correct date by clicking on a date of the calendar or on the navigation keys in the calendar header.
4. If logged in as resource manager: click on the resource calendar name in the plan board header. A “Day calendar” page appears.
5. Click the “Mark as free day” button on the right side of the calendar header. A red shaded time interval appears and the text ‘Unblocked for clients’ appears. (NB: it may happen that the word ‘clients’ is adapted to your professional jargon)
Block a time slot in your day schedule quickly so that clients can no longer make appointments on that time slot.
1. Log in as a calendar or resource manager.
2. Click on the ‘My Appointments’ menu as the calendar administrator or ‘Plan’ as the resource manager. A “Day calendar” or “Plan” page appears. (NB: it may occur that the word “Appointments” is adapted to your technical jargon)
3. Go to the correct date by clicking on a date of the calendar or on the navigation keys in the calendar header.
4. For resource manager: click on the resource calendar name in the plan board header. A “Day calendar” page appears.
5. Click the “Block” button to the right of an empty time slot in the calendar for blocking the time slot. A floating window will appear ‘Free Time Note’.
6. Optionally you can add a comment and click on the ‘Confirm’ button. A blocking symbol appears in the relevant time slot.
Yes, certainly. Both through an automatic filter (or recent visit or appointment period) and through a manual selection, customers can be selected before a message is sent.
Yes, clients can make an appointment without logging in to later cancel or cancel the appointment. A client registration form is always shown.
1. Log in as application manager.
2. Click on the ‘Settings’ menu. A ‘Settings’ page appears with various options.
3. Click on the ‘Registration’ button in the toolbar.
4. If necessary, click on the ‘Help’ button in the toolbar for more help about the input fields.
5. Click on the ‘Client registration’ drop-down list and choose ‘Without login’
6. Click on the ‘Save’ button.
Customer data can be exported to an Excel or Word-compatible .csv file.
This general format can be read by many other systems. This offers the possibility to integrate the data in other back-office systems (accounting, CRM, etc.)
Certainly! Precisely because an accurate overview is required, your mobile synchronizes with the online agenda and thus always gives you an up-to-date status.
Customers decide for themselves what information will be entered with the appointment. Yes, you can do that, our Privacy Policy shows you how.
getBIZZI meets SAAS suppliers’ standards and the safety advocated by GDPR/DSGVO. Read more.
When you use the Free Calendar, you are not bound to a contract. The Payment-by-Appointment agenda only requires you to pay the agreed delivery costs that you actually use. A monthly payment will be charged for this. Unlimited subscriptions are valid for the period they are entered into. Well before the expiry of the subscription you will receive an e-mail that gives you the opportunity to continue to serve your customers the way they were used to.
Calendar set-up
Extend your fixed opening hours with online booked service times. Communicate your extra flexible opening times via other channels such as voice mail and Social Media or store communication.
When you have enabled your booking portal, your company is bookable 24-7 and can be found on https://bedrijfsnaam.getbizzi.eu NB! so without www in the url otherwise you probably get an error message from your browser and/or antivirus program. Your calendar is not accessible through the World Wide Web but through the secure SSL connection under getbizzi.eu.
Therefor you can mention your company via mail, text or app messages, social or in your website content via htpps://companyname.getbizzi.eu (enter your given url instead of ‘companyname’ when signing up with getBIZZI)
Using the Message Board you can easily communicate with customers. This is the content for your personal appointment portal.
1. Log in as application manager.
2. Click on the ‘Message’ menu. A ‘Message’ page appears.
3. Enter a message and click on the ‘Save’ button.
4. Click on the list of languages at the top of the word processing toolbar for multilingual use.
A category Groups Calendars that can be linked to an appointment type for more effective sending of your clients to make an appointment.
For booking purposes it can be very useful for the visitor to see that certain groups of appointments have been set up. E.g. Beauty salons have Category ‘Permanent makeup’ (for treatment types eyeliner under, lipliner, fresh-up etc.)
1. Log in as application manager.
2. Click on the’Category’ menu. A page with table ‘Category’ appears.
3. Click on the ‘Add’ button in the button bar, to create a category or click on the ‘Change’ button in the table row to change a category (or click on the category in the table). A floating ‘Category’ window appears.
4. If necessary, click the ‘i’ button in the header for more help about the input fields.
5. After entering all the data click on the ‘Save’ or ‘Save & Translate’ for multilingual use.
Short answer: Facebook changed its rules.
Details: Due to recent API changes, Facebook decided only to allow this feature when you have more than 2000 page likes.
Solution?
Best solution to be able to get online bookings directly from your (<2k liked) Facebook page, is to convince Facebook they should lift this limitation: Ask them.
Within current rules, the only solution is to get 2000 likes. Real likes or bought ones (latter not advised).
Workaround
A powerful manual workaround is just posting content with prepared booking scripts from the getBIZZI widget service. There is always a way getting your services noticed!
We apologize for this inconvenience but this is something we do not have control over.
Popular?
For those of you who do have an active and widely appreciated Facebook page, make sure your followers are even more charmed by your integrated online booking service. Clicking a ‘Book Now’ button and claim your appointment within Facebook maybe more to their liking!
Calendars are persons or resources with which an appointment can be made.
1. Log in as application manager.
2. Click on the ‘Calendar’ menu. A page with table ‘Calendar’ appears.
3. Click on the ‘Add’ button in the button bar to create a calendar, or click on the ‘Change’ button in the table row to change a calendar (or click on the calendar in the table). A floating window will appear: ‘New Calendar’.
4. If necessary, click the ‘i’ button in the header for more help about the input fields.
5. After entering all the data, click on the ‘Save’ button.
Calendar in use
When you have enabled your booking portal, your company is bookable 24-7 and can be found on https://bedrijfsnaam.getbizzi.eu NB! so without www in the url otherwise you probably get an error message from your browser and/or antivirus program. Your calendar is not accessible through the World Wide Web but through the secure SSL connection under getbizzi.eu.
Therefor you can mention your company via mail, text or app messages, social or in your website content via htpps://companyname.getbizzi.eu (enter your given url instead of ‘companyname’ when signing up with getBIZZI)
Find out where your customers are online and go and recruit.
- Make sure your booking button is clearly visible on your website.
- Create a booking link (see here how).
- Send invitations via your mail network (with permission).
- Create an offer page on your website.
- Provide a Facebook calendar page (check FB rules).
- Make your current customers a special offer .
- All the above free promotions can be complemented with paid campaigns via Social Media.
Simply by selecting the Day Off button, when you are logged in on your calendar.

First of all, your offer must be attractive. Based on this, availability is the most important thing. It is a myth that customers always want everything directly. Especially in services when they have to be present themselves, customers prefer to search for a suitable time. The knowledge that they have secured a reservation is at least as satisfying.
You know your customers best. You know the online channels they use. Because your agenda can be placed anywhere, you can always be reached with 1 click, without worrying about inconvenient telephone calls.
Our rSVP appointment push makes it possible to make an attractive offer within your customer base. Your conversions are fast and always personal!
A number of things seem to work well with our customers.
- Novice online customers prefer – after approval – you already create their login account. The easiest way to do this is have them log in via a Google account and, for example, log in with their mobile phone immediately. Show them how when they visit your place.
- Many customers appreciate it when a new appointment is planned at the end of their service, scheduled by the service provider. (Confirmation mail is received as a reminder by customer).
- Very much appreciated gestures are special birthday e-mails, especially those including a personal service offer to celebrate the occacion (in the form of a trial sample or extra discount).
- In order to spread customers more evenly, remarketing emails are sometimes sent out, to fill slow hours at a reduced rate for instance.
Extend your fixed opening hours with online booked service times. Communicate your extra flexible opening times via other channels such as voice mail and Social Media or store communication.
You can integrate your services schedule into your website or social media channels in various ways. Via a ‘Book Now’ button or via a link in your web content or even via a small, integrated live calendar through a widget.
This is how you create your own codes: Step by Step widget generator.
You can easily create the codes to build this via our widget generator. This is accessible in your dashboard via ‘Promote’. You can fix this yourself or, if you prefer this to be done by your web designer, you can authorize it once to generate the codes for you [use Webdesigner button].
When logged in on your calendar, click on the Client’s menu. Then all clients who have used your calendar will appear. Click on the person in question and choose from the drop-down menu: ‘Mail username and password’. Your customer then receives an e-mail with the necessary information.
You can also easily send a message with automatically created user names and passwords when you yourself enter or import your customers. Very handy.
Questions from clients
When you have enabled your booking portal, your company is bookable 24-7 and can be found on https://bedrijfsnaam.getbizzi.eu NB! so without www in the url otherwise you probably get an error message from your browser and/or antivirus program. Your calendar is not accessible through the World Wide Web but through the secure SSL connection under getbizzi.eu.
Therefor you can mention your company via mail, text or app messages, social or in your website content via htpps://companyname.getbizzi.eu (enter your given url instead of ‘companyname’ when signing up with getBIZZI)
Of course they can! Even in different ways:
- You can leave them free and have them booked once (via your own login name).
- You send them an invitation link, in which the appointment type and period has already been proposed.
- You book a sequel yourself at the end of the current appointment upon oral consultation.
You would think that. But then again, is the time you spend on the phone with one customer not at the expense of your personal contact with the other customer?
It turns out that because there are no phone interruptions during your service provision, you are more focused on personal wishes and social small talk, thereby strengthening the personal relationship. Each service provider will thus be maximally charged for any personal service.
Simple, getBIZZI simply cannot double-book.
Duplicate bookings are most likely to occur when you manually book items yourself, without the system being aware of it. If you use other – unsynchronized online agendas – besides your getBIZZI work agenda – getBIZZI will not know that you have blocked time with other activities. In case of synchronization, getBIZZI knows – after checking in your other agenda – whether these timeslots can actually be offered as free for services.
getBIZZI supports the online advance payment by customers via iDEAL. It does so via Mollie payment services.
A number of things seem to work well with our customers.
- Novice online customers prefer – after approval – you already create their login account. The easiest way to do this is have them log in via a Google account and, for example, log in with their mobile phone immediately. Show them how when they visit your place.
- Many customers appreciate it when a new appointment is planned at the end of their service, scheduled by the service provider. (Confirmation mail is received as a reminder by customer).
- Very much appreciated gestures are special birthday e-mails, especially those including a personal service offer to celebrate the occacion (in the form of a trial sample or extra discount).
- In order to spread customers more evenly, remarketing emails are sometimes sent out, to fill slow hours at a reduced rate for instance.
Of course you can use e-mail campaigns to let your customers book directly. Using a simple link or a Book Now button, every campaign can be made 100% bookable. (How? Check this).
Send your service provider an e-mail and ask for a solution. Your details will then be sent to you quickly. See also: resetting and sending log-in data.
SMB and business use
First of all, your offer must be attractive. Based on this, availability is the most important thing. It is a myth that customers always want everything directly. Especially in services when they have to be present themselves, customers prefer to search for a suitable time. The knowledge that they have secured a reservation is at least as satisfying.
You know your customers best. You know the online channels they use. Because your agenda can be placed anywhere, you can always be reached with 1 click, without worrying about inconvenient telephone calls.
Our rSVP appointment push makes it possible to make an attractive offer within your customer base. Your conversions are fast and always personal!
getBIZZI supports the online advance payment by customers via iDEAL. It does so via Mollie payment services.
Account managers can give customers access themselves or through their internal planning staff to book visits on a regular basis. The field staff has allocated a region either through the system or through cooperation with the office staff for specific days. The result: always maximum efficiency and effective spending of acquisition time! Of course, the account manager is free to make appointments at the last moment – sometimes due to force majeure.
A number of things seem to work well with our customers.
- Novice online customers prefer – after approval – you already create their login account. The easiest way to do this is have them log in via a Google account and, for example, log in with their mobile phone immediately. Show them how when they visit your place.
- Many customers appreciate it when a new appointment is planned at the end of their service, scheduled by the service provider. (Confirmation mail is received as a reminder by customer).
- Very much appreciated gestures are special birthday e-mails, especially those including a personal service offer to celebrate the occacion (in the form of a trial sample or extra discount).
- In order to spread customers more evenly, remarketing emails are sometimes sent out, to fill slow hours at a reduced rate for instance.
First, C-level management / owners must endorse the effectiveness of getBIZZI. The market side (Marketing, Sales & Account management and office staff) of the company will have to work together with the internal business processes (Finance, IT and Human Resources).
The best chance of success is when external sales trust their internal colleagues, which ensures a perfect symbiosis of new leads and closed deals. Group targets are almost a must here.
Essentially, anyone with some agenda planning and account management experience is able to set up a well-functioning appointment reservation system. We do, however, advise the Administrators of planning SMEs to follow our Certified Calendar Management webinar (in development). Contact us for more information.
Every combination of a time period and a standardized service that has to be delivered in person is easy to book online.
Most successful are ambulatory services, acupuncture, hairdresser and beauty centers, financial services, automotive and personal healthcare. Personal coaching, trainers and consultancy are also favorites. Agreements with (lower) governments are also increasingly common (passport, driver’s license). Services that require a personal intake, such as psychologists, relationship therapists and accountancy services, are certainly also popular.
Actually, every professional who wants to make direct contact with the market without campaign money.
Of course you can use e-mail campaigns to let your customers book directly. Using a simple link or a Book Now button, every campaign can be made 100% bookable. (How? Check this).
When logged in on your calendar, click on the Client’s menu. Then all clients who have used your calendar will appear. Click on the person in question and choose from the drop-down menu: ‘Mail username and password’. Your customer then receives an e-mail with the necessary information.
You can also easily send a message with automatically created user names and passwords when you yourself enter or import your customers. Very handy.
Accountmanagement for planners
Account managers can give customers access themselves or through their internal planning staff to book visits on a regular basis. The field staff has allocated a region either through the system or through cooperation with the office staff for specific days. The result: always maximum efficiency and effective spending of acquisition time! Of course, the account manager is free to make appointments at the last moment – sometimes due to force majeure.
First, C-level management / owners must endorse the effectiveness of getBIZZI. The market side (Marketing, Sales & Account management and office staff) of the company will have to work together with the internal business processes (Finance, IT and Human Resources).
The best chance of success is when external sales trust their internal colleagues, which ensures a perfect symbiosis of new leads and closed deals. Group targets are almost a must here.
Essentially, anyone with some agenda planning and account management experience is able to set up a well-functioning appointment reservation system. We do, however, advise the Administrators of planning SMEs to follow our Certified Calendar Management webinar (in development). Contact us for more information.
When logged in on your calendar, click on the Client’s menu. Then all clients who have used your calendar will appear. Click on the person in question and choose from the drop-down menu: ‘Mail username and password’. Your customer then receives an e-mail with the necessary information.
You can also easily send a message with automatically created user names and passwords when you yourself enter or import your customers. Very handy.